自定义View

目录

自定义View
自定义View之Canvas
自定义View之Paint

概述

自定义属性

声明属性

使用declare-styleable声明属性

1
2
3
4
5
6
7
8
9
10
11
12
13
14
15
16
17
18
19
20

<?xml version="1.0" encoding="utf-8"?>
<resources>
<attr name="enableOnPad" format="boolean" />
<attr name="supportDeviceType" format="reference"/>
<!-- 如果有通用的属性,可以抽离出来 -->
<declare-styleable name="ExTextView">
<attr name="enableOnPad"/>
<attr name="supportDeviceType"/>
</declare-styleable>

<declare-styleable name="ExEditText">
<attr name="enableOnPad"/>
<attr name="supportDeviceType"/>
<attr name="line_color" format="color" />
<attr name="line_stroke_height" format="dimension"/>
</declare-styleable>
</resources>


使用属性

1
2
3
4
5
6
7
8
9
10
11
12
13
14
15
16
17
18
19
20
21
22
23
24
25
26
27
28


xml中使用属性

<RelativeLayout xmlns:android="http://schemas.android.com/apk/res/android"
android:layout_width="match_parent"
android:layout_height="match_parent"
xmlns:app="http://schemas.android.com/apk/res-auto" //自动查找
xmlns:tools="http://schemas.android.com/tools"
android:orientation="vertical">
<CustomView
android:layout_width="match_parent"
android:layout_height="60dp"
app:line_color=""
/>
</RelativeLayout>

public class CustomView extends View {

public DottedLineView(Context context, @Nullable AttributeSet attrs, int defStyleAttr) {
super(context, attrs, defStyleAttr);
// 根据Style拿到TypedArray
TypedArray array = getContext().obtainStyledAttributes(attrs, R.styleable.ExEditText);
mLineColor = array.getColor(R.styleable.ExEditText_line_color, getResources().getColor(R.color.Red));
mLineStrokeHeight = array.getDimension(R.styleable.ExEditText_line_stroke_height, dp2px(getContext(), 1));
array.recycle();
}
}

Read More

自定义View之Paint

目录

自定义View
自定义View之Canvas
自定义View之Paint

API

颜色设置

1
2
3
4
5
6
7
8
9
10
11
12

setColor(int color)

paint.setColor(Color.parseColor("#009688"));
canvas.drawRect(30, 30, 230, 180, paint);


setARGB(int a, int r, int g, int b)

paint.setARGB(100, 255, 0, 0);
canvas.drawRect(0, 0, 200, 200, paint);

Shader设置

在 Android 的绘制里使用 Shader ,并不直接用 Shader 这个类,而是用它的几个子类。具体来讲有:

Read More

Activity

由来

我们在做带UI的软件时,一般的做法是先创建一个窗口,然后在窗口上添加各种Button、Text、List等其他UI控件。Android、iOS也是类似,但代码的设计上跟PC端
有些差别,Android使用Activity来管理UI、iOS使用ViewController。一般软件的入口都是main函数开始,Android中则通过描述文件AndroidManifest.xml配置一个Activity的属性作为入口。用户操作手机的时候使得一个界面可能处于可视状态,也可能处理隐藏状态,对应着Activity会有自己的生命周期。不同UI的嵌套
也是需要维护的,所以就有了Activity任务栈,对应着不同Activity有不同的启动模式。不同的Activity之间又可能需要数据传递,因而有了Intent

生命周期

回调函数

onCreate

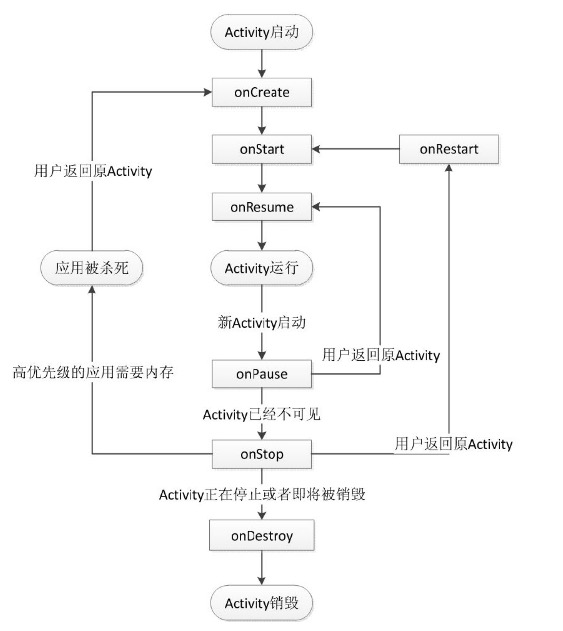
生命周期中的第一个函数,整个生命周期中只会调用一次。savedInstanceState参数如果不为空,表示Activity暂时销毁时有存储一些数据,此时可以恢复。

onRestart

当前Activity从不可见重新变为可见状态时,会调用。

onStart

此时准备进入前台了

Read More

Activity工作过程

概述

Activity是一种展示型组件,具有两种启动方式,一种是显示的,通过intent实现;另一种是隐式的,也需要intent,但还需要在AndroidManifest.xml
中添加intentfilter。在实现Activity时,需要继承Activity抽象类,并且重写onCreat()方法,因此,Activity具有启动和停止的概念。

流程分析

流程图

Activity的启动

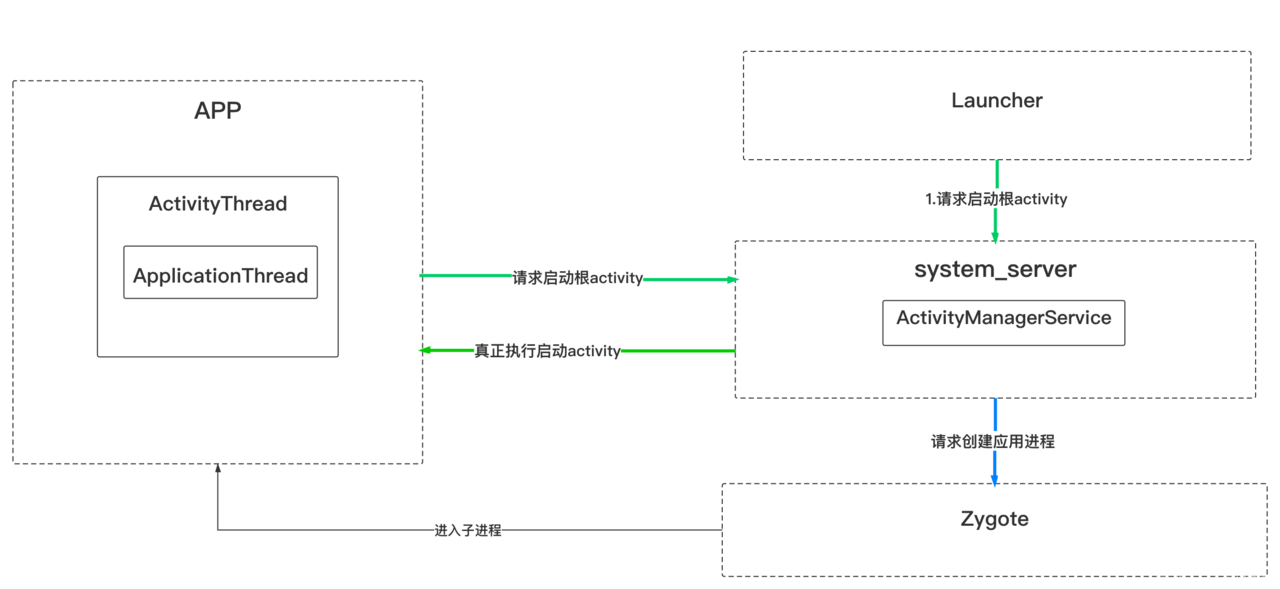
从startActivity开始,代码会运行到Activity的startActivityForResult方法。

1
2
3
4
5
6
7
8
9
10
11
12
13
14
15
16
17
18
19
20
21
22
23
24
25
26
27
28
29
30
31
32
33
34
35
36
37
38
39
Activity.java

public void startActivityForResult(@RequiresPermission Intent intent, int requestCode,
@Nullable Bundle options) {
if (mParent == null) {
options = transferSpringboardActivityOptions(options);
Instrumentation.ActivityResult ar =
mInstrumentation.execStartActivity(
this, mMainThread.getApplicationThread(), mToken, this,
intent, requestCode, options);
if (ar != null) {
mMainThread.sendActivityResult(
mToken, mEmbeddedID, requestCode, ar.getResultCode(),
ar.getResultData());
}
if (requestCode >= 0) {
// If this start is requesting a result, we can avoid making
// the activity visible until the result is received. Setting
// this code during onCreate(Bundle savedInstanceState) or onResume() will keep the
// activity hidden during this time, to avoid flickering.
// This can only be done when a result is requested because
// that guarantees we will get information back when the
// activity is finished, no matter what happens to it.
mStartedActivity = true;
}

cancelInputsAndStartExitTransition(options);
// TODO Consider clearing/flushing other event sources and events for child windows.
} else {
if (options != null) {
mParent.startActivityFromChild(this, intent, requestCode, options);
} else {
// Note we want to go through this method for compatibility with
// existing applications that may have overridden it.
mParent.startActivityFromChild(this, intent, requestCode);
}
}
}

Read More

Android系统架构

系统架构

Linux内核层

Linux Kernel:Android 的核心系统服务基于Linux 内核,在此基础上添加了部分Android专用的驱动。系统的安全性、内存管理、进程管理、网络协议栈和驱动模型等都依赖于该内核。

硬件抽象层

Hardware Abstraction Layer:对Linux内核驱动程序的封装,向上提供接口,向下屏蔽了具体的实现细节。硬件抽象层是位于操作系统内核与硬件电路之间的接口层,
其目的在于将硬件抽象化,为了保护硬件厂商的知识产权,它隐藏了特定平台的硬件接口细节,为操作系统提供虚拟硬件平台,使其具有硬件无关性,可在多种平台上进行移植。
从软硬件测试的角度来看,软硬件的测试工作都可分别基于硬件抽象层来完成,使得软硬件测试工作的并行进行成为可能。通俗来讲,就是将控制硬件的动作放在硬件抽象层中。

系统运行层

Native C/C++ Libraries:系统运行层分为C/C++运行时库和Android运行时环境。

Android运行时环境在4.4以前使用的是Dalvik,之后使用ART。从5.0开始,正式废弃了Dalvik。

Read More