Handler原理

Catalogue   

Hanlder系列目录:

概要

Handler是Android子线程和主线程之间通信的一种机制。像Qt等技术使用的也是类似的消息机制。

我们站在设计者的角度思考,如果要自己搭建一套线程间通信会怎么做?

首先应该有个消息队列queue,然后在线程中无限轮询,发现队列里面有数据了,就拿出来,调用其target的回调。Android就是这样来设计的,而Handler类只是一个
辅助,它有消息和对象的引用,方便调用。HandlerThread呢,又帮我们封装了一个用于两个子线程的通信。它帮我们考虑到了异步调用的时间先后问题。

在native层,还是基于pthread相关API的封装。

使用Handler的原因是多个线程并发更新UI的同时保证线程安全。

概念 定义 作用
主线程 当应用程序第一次启动时,会同时自动开启一条主线程 处理UI相关
子线程 人为手动创建的线程 执行耗时操作
消息(Message) 线程间通讯的数据单元 存储需要操作的信息
消息队列(MessageQueue) 一种数据结构 存储Handler发送过来的信息(Message)
处理者(Handler) 主线程与子线程的通信媒介,线程消息的主要处理者 添加消息到消息队列,处理Looper分派过来的消息
循环器(Looper) 消息队列与处理器的通信媒介 消息获取:循环取出消息队列的消息,消息分发:将取出的消息发送给对应的处理者
ThreadLocal 用于不同线程保存自己的信息

工作流程

  1. 异步通信准备
    • 在主线程中创建
      • 处理器对象Looper
      • 消息队列对象MessageQueue,Looper自动进入消息循环
      • Handler对象,自动绑定主线程的Looper、MessageQueue
  2. 消息发送
  3. 消息循环
  4. 消息处理

注意

  • 每个线程只有一个Looper
  • 一个Looper可以绑定多个线程的Handler(实现线程间通信)
  • 在Looper中有一个setMessageLogging方法,可以添加日志的监听,用于分析所有的消息

源码分析

按照我们的使用顺序,先看看Handler的构造函数

1
2
3
4
5
6
7
8
9
10
11
12
13
14
15
16
17
18
19
20
21
22
23
24
25
26
27
//接受Looper参数,绑定线程
public Handler(@NonNull Looper looper) {
this(looper, null, false);
}

public Handler(@Nullable Callback callback, boolean async) {
if (FIND_POTENTIAL_LEAKS) {
final Class<? extends Handler> klass = getClass();
if ((klass.isAnonymousClass() || klass.isMemberClass() || klass.isLocalClass()) &&
(klass.getModifiers() & Modifier.STATIC) == 0) {
Log.w(TAG, "The following Handler class should be static or leaks might occur: " +
klass.getCanonicalName());
}
}

//绑定线程,在使用的时候,如果不设置Looper,则使用当前线程的Looper。
//Looper.myLooper()作用:获取当前线程的Looper对象;若线程无Looper对象则抛出异常
mLooper = Looper.myLooper();
if (mLooper == null) {
throw new RuntimeException(
"Can't create handler inside thread " + Thread.currentThread()
+ " that has not called Looper.prepare()");
}
mQueue = mLooper.mQueue;
mCallback = callback;
mAsynchronous = async;
}

那么Looper是在什么时候构造的呢?我们可以先看看主线程的初始化是如何做的,以下是ActivityThread的入口函数。

1
2
3
4
5
6
7
8
9
10
11
12
13
14
15
16
17
18
19
20
21
22
23
24
25
26
27
28
29
30
31
32
33
34
35
36
37
38
39
40
41
42
43
44
45
46
47
48
49
50
51
public static void main(String[] args) {
Trace.traceBegin(Trace.TRACE_TAG_ACTIVITY_MANAGER, "ActivityThreadMain");

// CloseGuard defaults to true and can be quite spammy. We
// disable it here, but selectively enable it later (via
// StrictMode) on debug builds, but using DropBox, not logs.
CloseGuard.setEnabled(false);

Environment.initForCurrentUser();

// Set the reporter for event logging in libcore
EventLogger.setReporter(new EventLoggingReporter());

// Make sure TrustedCertificateStore looks in the right place for CA certificates
final File configDir = Environment.getUserConfigDirectory(UserHandle.myUserId());
TrustedCertificateStore.setDefaultUserDirectory(configDir);

Process.setArgV0("<pre-initialized>");

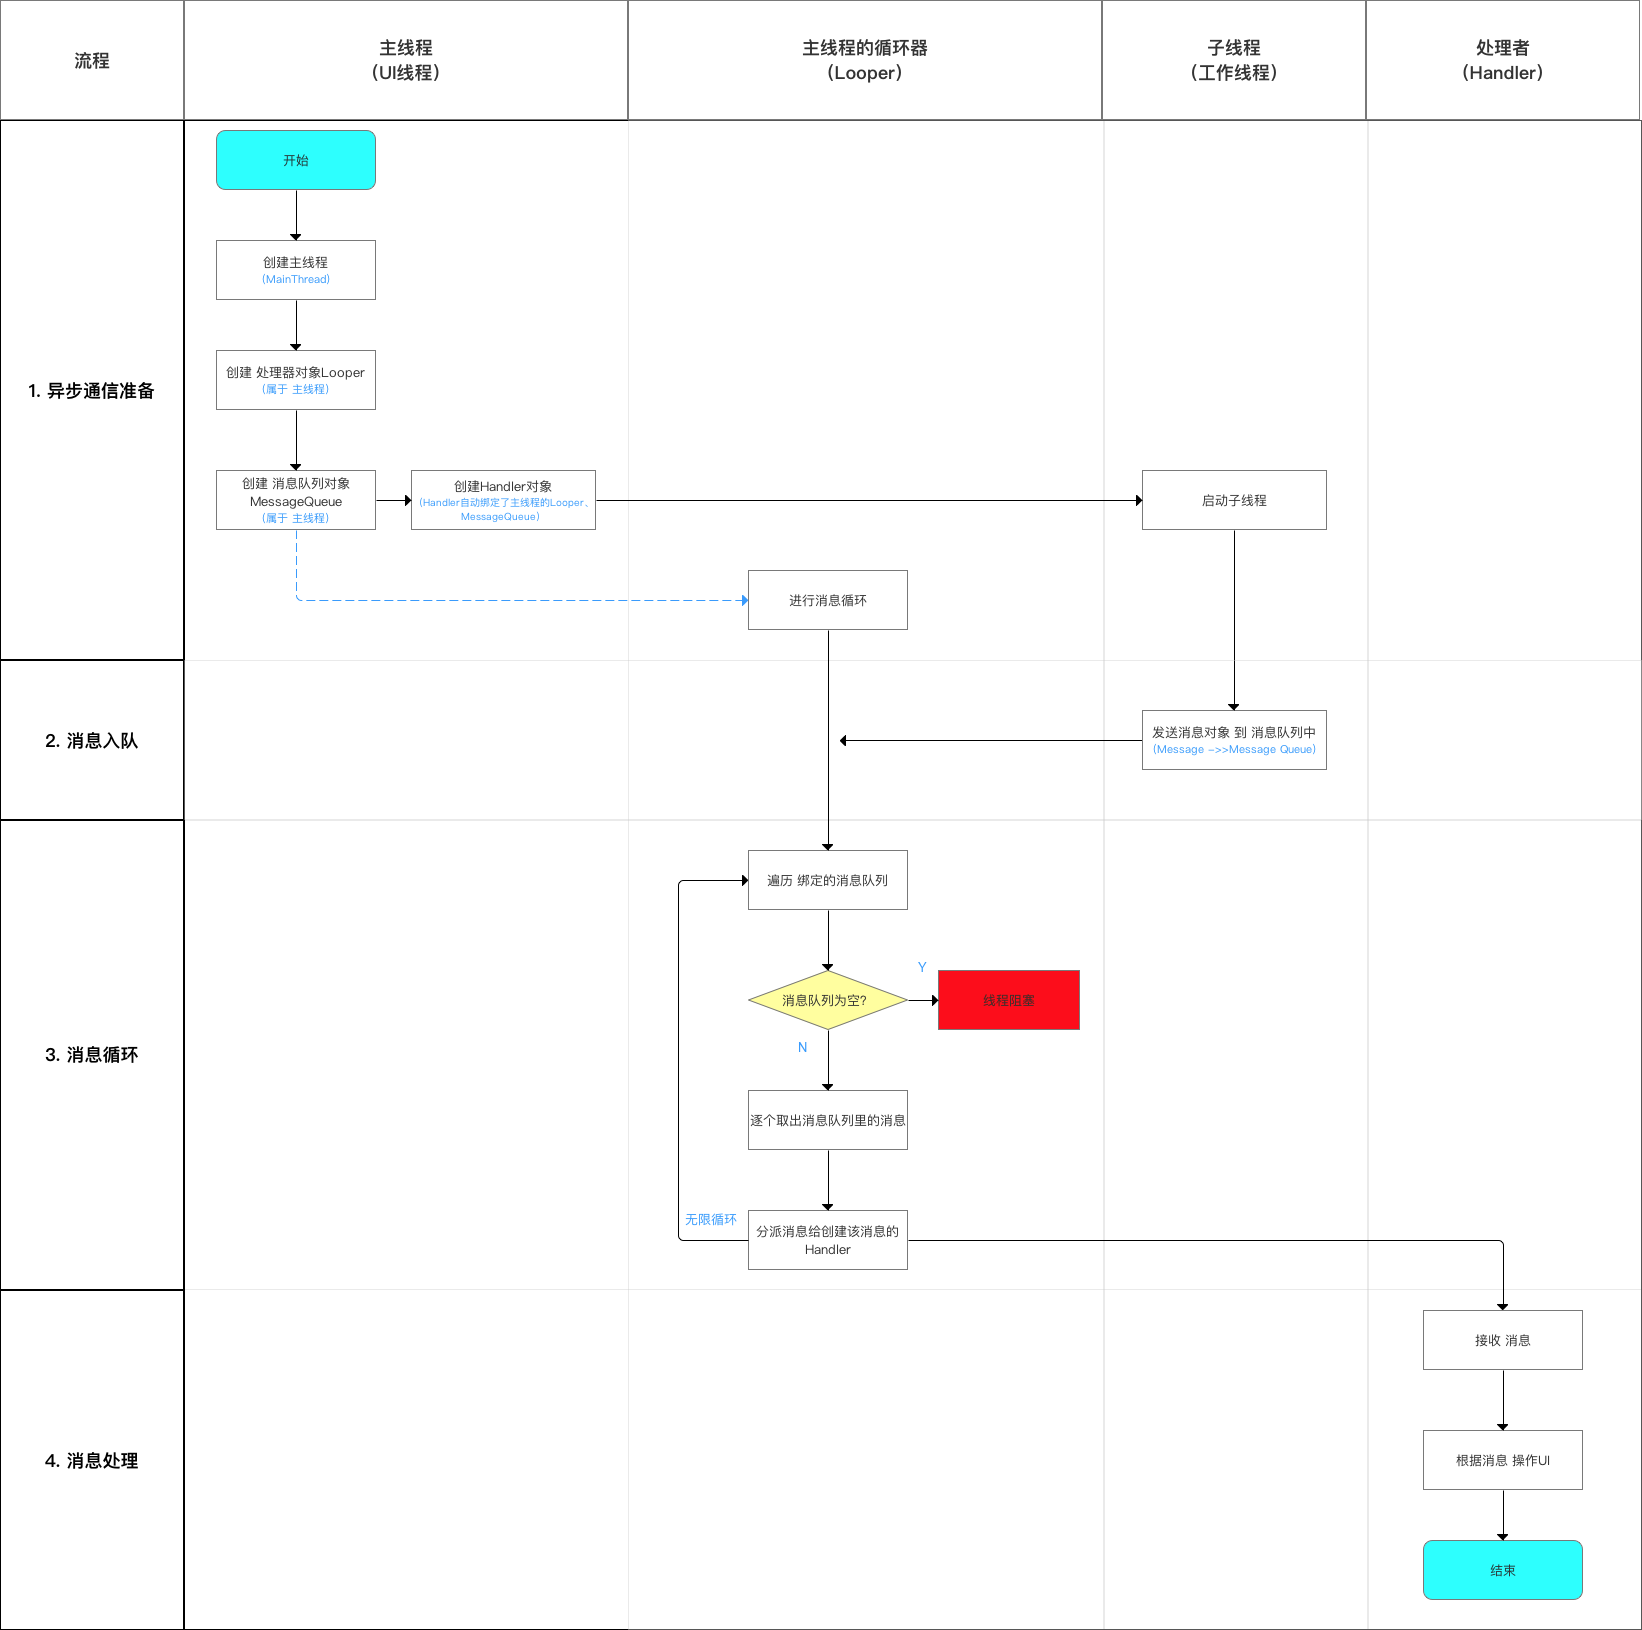
Looper.prepareMainLooper();//构造了Looper

// Find the value for {@link #PROC_START_SEQ_IDENT} if provided on the command line.
// It will be in the format "seq=114"
long startSeq = 0;
if (args != null) {
for (int i = args.length - 1; i >= 0; --i) {
if (args[i] != null && args[i].startsWith(PROC_START_SEQ_IDENT)) {
startSeq = Long.parseLong(
args[i].substring(PROC_START_SEQ_IDENT.length()));
}
}
}
ActivityThread thread = new ActivityThread();
thread.attach(false, startSeq);

if (sMainThreadHandler == null) {
sMainThreadHandler = thread.getHandler();
}

if (false) {
Looper.myLooper().setMessageLogging(new
LogPrinter(Log.DEBUG, "ActivityThread"));
}

// End of event ActivityThreadMain.
Trace.traceEnd(Trace.TRACE_TAG_ACTIVITY_MANAGER);
Looper.loop();//looper进入循环,正常情况下下面的代码是不会执行的

throw new RuntimeException("Main thread loop unexpectedly exited");
}

那么Looper内部又做了什么呢?

1
2
3
4
5
6
7
8
9
10
11
12
13
14
15
16
17
18
19
20
21
22
23
24
25
26
27
28
29
30
31
32
33
34
35
36
37
38
39
40
41
42
43
44
45
46
47
48
49
50
51
52
53
54
55
56
57
58
59
60
61
62
63
64
65
66
67
68
69
70
public static void prepareMainLooper() {
prepare(false);
synchronized (Looper.class) {
if (sMainLooper != null) {
throw new IllegalStateException("The main Looper has already been prepared.");
}
sMainLooper = myLooper();
}
}

private static void prepare(boolean quitAllowed) {
//判断looper是否是null如果是,就创建,并将其存到ThreadLocal中,上面说的handler中的looper就是从ThreadLocal中取出来的;
//这里可知,每个线程只有一个Looper
if (sThreadLocal.get() != null) {
throw new RuntimeException("Only one Looper may be created per thread");
}
sThreadLocal.set(new Looper(quitAllowed));
}

public static void loop() {
final Looper me = myLooper();
if (me == null) {
throw new RuntimeException("No Looper; Looper.prepare() wasn't called on this thread.");
}
final MessageQueue queue = me.mQueue;

Binder.clearCallingIdentity();
final long ident = Binder.clearCallingIdentity();

for (;;) {
Message msg = queue.next(); // might block
if (msg == null) {
// No message indicates that the message queue is quitting.
return;
}

final Printer logging = me.mLogging;
if (logging != null) {
logging.println(">>>>> Dispatching to " + msg.target + " " +
msg.callback + ": " + msg.what);
}

final long traceTag = me.mTraceTag;
if (traceTag != 0 && Trace.isTagEnabled(traceTag)) {
Trace.traceBegin(traceTag, msg.target.getTraceName(msg));
}
try {
msg.target.dispatchMessage(msg); //分发消息,这里的target就是handler
} finally {
if (traceTag != 0) {
Trace.traceEnd(traceTag);
}
}

if (logging != null) {
logging.println("<<<<< Finished to " + msg.target + " " + msg.callback);
}
final long newIdent = Binder.clearCallingIdentity();
if (ident != newIdent) {
Log.wtf(TAG, "Thread identity changed from 0x"
+ Long.toHexString(ident) + " to 0x"
+ Long.toHexString(newIdent) + " while dispatching to "
+ msg.target.getClass().getName() + " "
+ msg.callback + " what=" + msg.what);
}

msg.recycleUnchecked(); //消息的回收
}
}

至此,我们知道一个线程中只有一个Looper,Looper进行循环后,会不停的从消息队列中拿到消息进行处理。

然后就是消息的发送和接收,我们先看看消息是如何发送的

1
2
3
4
5
6
7
8
9
10
11
12
13
14
15
16
17
18
19
20
21
22
23
24
25
26
27
28
29
30
31
32
33
34
35
36
Handler.java

//发送消息
public final boolean sendMessage(@NonNull Message msg) {
return sendMessageDelayed(msg, 0);
}

public final boolean sendMessageDelayed(@NonNull Message msg, long delayMillis) {
if (delayMillis < 0) {
delayMillis = 0;
}
return sendMessageAtTime(msg, SystemClock.uptimeMillis() + delayMillis);
}

public boolean sendMessageAtTime(@NonNull Message msg, long uptimeMillis) {
MessageQueue queue = mQueue;
if (queue == null) {
RuntimeException e = new RuntimeException(
this + " sendMessageAtTime() called with no mQueue");
Log.w("Looper", e.getMessage(), e);
return false;
}
return enqueueMessage(queue, msg, uptimeMillis);
}

private boolean enqueueMessage(@NonNull MessageQueue queue, @NonNull Message msg,
long uptimeMillis) {
msg.target = this;
msg.workSourceUid = ThreadLocalWorkSource.getUid();

if (mAsynchronous) {
msg.setAsynchronous(true);
}
//消息被添加到消息队列中,loop中处理
return queue.enqueueMessage(msg, uptimeMillis);
}

从loop方法中可知,dispatchMessage会最终处理消息

1
2
3
4
5
6
7
8
9
10
11
12
13
14
15
Handler.java

public void dispatchMessage(@NonNull Message msg) {
if (msg.callback != null) {
handleCallback(msg);
} else {
if (mCallback != null) {
if (mCallback.handleMessage(msg)) {
return;
}
}
handleMessage(msg);
}
}

  1. 判断msg.callback是不是null,如果不是,那么就给这个callback处理,这个callback是message中的一个Runnable;Message.obtain()其实是有
    其他参数的方法的,其中有一个是obtain(Handler h, Runnable callback);如果你用了这个,那么消息就会在你实现的Runnable中接收到处理的回调;
  2. 第二个是判断handler内部的callback是不是null,如果不是null,就让他去处理,这里的Callback可不是Runnable了,他是一个interface,里面
    定义了一个handleMessage(Message msg);方法,这个怎么实现呢?handler类里同样有Handler(Callback callback)构造方法
  3. 最后才轮到handler类里的方法handleMessage来处理消息。

底层原理

Handler引起的内存泄露原因以及最佳解决方案

Handler允许我们发送延时消息,如果在延时期间用户关闭了Activity,那么该 Activity 会泄露。 这个泄露是因为 Message 会持有 Handler,
而又因为 Java 的特性,内部类会持有外部类,使得 Activity 会被 Handler 持有,这样最终就导致 Activity 泄露。

将Handler定义成静态的内部类,在内部持有 Activity 的弱引用,并在Acitivity的onDestroy()中调用handler.removeCallbacksAndMessages(null)
及时移除所有消息。具体用法可以参考Handler基本用法

参考