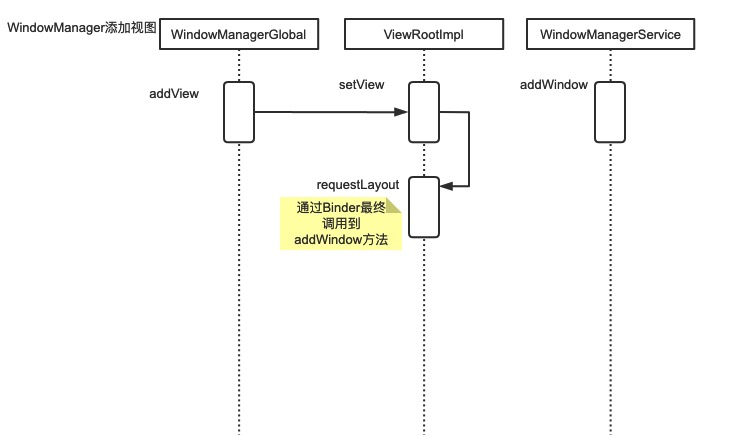
//WindowManagerGlobal.java publicvoidaddView(View view, ViewGroup.LayoutParams params, Display display, Window parentWindow) { if (view == null) { thrownewIllegalArgumentException("view must not be null"); } if (display == null) { thrownewIllegalArgumentException("display must not be null"); } if (!(params instanceof WindowManager.LayoutParams)) { thrownewIllegalArgumentException("Params must be WindowManager.LayoutParams"); }
final WindowManager.LayoutParamswparams= (WindowManager.LayoutParams) params; if (parentWindow != null) { parentWindow.adjustLayoutParamsForSubWindow(wparams); } else { // If there's no parent, then hardware acceleration for this view is // set from the application's hardware acceleration setting. finalContextcontext= view.getContext(); if (context != null && (context.getApplicationInfo().flags & ApplicationInfo.FLAG_HARDWARE_ACCELERATED) != 0) { wparams.flags |= WindowManager.LayoutParams.FLAG_HARDWARE_ACCELERATED; } }
ViewRootImpl root; ViewpanelParentView=null;
synchronized (mLock) { // Start watching for system property changes. if (mSystemPropertyUpdater == null) { mSystemPropertyUpdater = newRunnable() { @Overridepublicvoidrun() { synchronized (mLock) { for (inti= mRoots.size() - 1; i >= 0; --i) { mRoots.get(i).loadSystemProperties(); } } } }; SystemProperties.addChangeCallback(mSystemPropertyUpdater); }
intindex= findViewLocked(view, false);//判断是否已经添加 if (index >= 0) { if (mDyingViews.contains(view)) { // Don't wait for MSG_DIE to make it's way through root's queue. mRoots.get(index).doDie(); } else { thrownewIllegalStateException("View " + view + " has already been added to the window manager."); } // The previous removeView() had not completed executing. Now it has. }
// If this is a panel window, then find the window it is being // attached to for future reference. if (wparams.type >= WindowManager.LayoutParams.FIRST_SUB_WINDOW && wparams.type <= WindowManager.LayoutParams.LAST_SUB_WINDOW) { finalintcount= mViews.size(); for (inti=0; i < count; i++) { if (mRoots.get(i).mWindow.asBinder() == wparams.token) { panelParentView = mViews.get(i); } } }
// do this last because it fires off messages to start doing things try { root.setView(view, wparams, panelParentView);//PhoneWindow要开始创建 } catch (RuntimeException e) { // BadTokenException or InvalidDisplayException, clean up. if (index >= 0) { removeViewLocked(index, true); } throw e; } } }
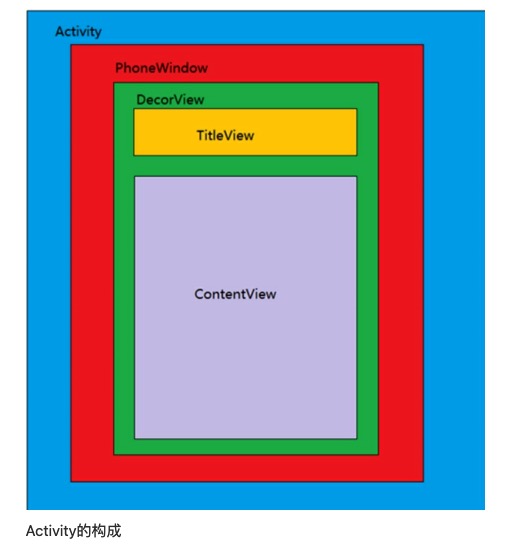
//PhoneWindow.java publicvoidsetContentView(int layoutResID) { // Note: FEATURE_CONTENT_TRANSITIONS may be set in the process of installing the window // decor, when theme attributes and the like are crystalized. Do not check the feature // before this happens. if (mContentParent == null) { installDecor(); } elseif (!hasFeature(FEATURE_CONTENT_TRANSITIONS)) { mContentParent.removeAllViews(); }
protected DecorView generateDecor(int featureId) { // System process doesn't have application context and in that case we need to directly use // the context we have. Otherwise we want the application context, so we don't cling to the // activity. Context context; if (mUseDecorContext) { ContextapplicationContext= getContext().getApplicationContext(); if (applicationContext == null) { context = getContext(); } else { context = newDecorContext(applicationContext, getContext()); if (mTheme != -1) { context.setTheme(mTheme); } } } else { context = getContext(); } returnnewDecorView(context, featureId, this, getAttributes()); }